Understand the functionality of our Assessment Results Manual Entry Tool. Clinicians can enter scores, store files and generate graphs for the CFQL-2, FAST, IGLR, KIDSCREEN, PDDBI, PSI, VB-MAPP, ABLLLS-R, AFLS, and the Vineland-3!
Article Navigation
ABLLS-R
AFLS (Basic Living Skills, Community Participation, Home Skills, Independent Living Skills, School Skills and Vocational Skills)
📹 Child and Family Quality of Life, Second Edition (CFQL-2)
Steps for inputting CFQL-2 Scores:
1. Select the client's name from the drop down in the top left corner
2. Click the [Progress] tab on the left hand side.
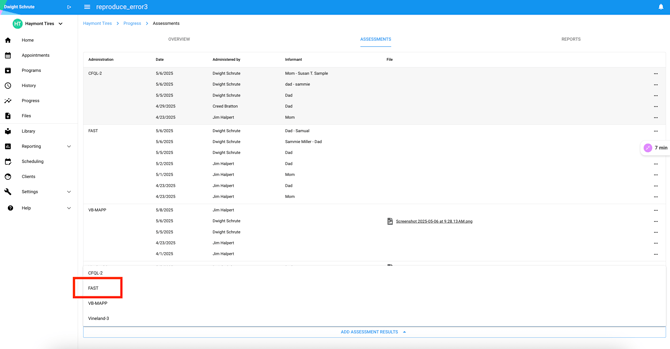
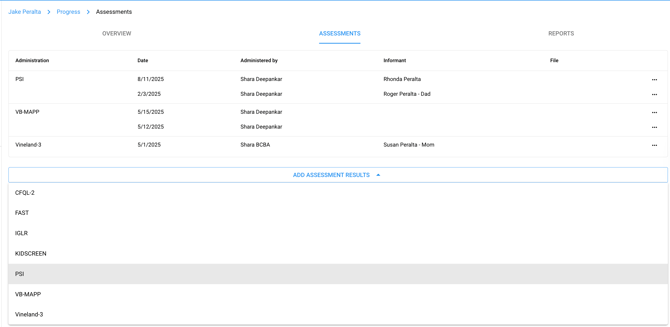
3. Click the [Assessments] tab in the middle of the page.
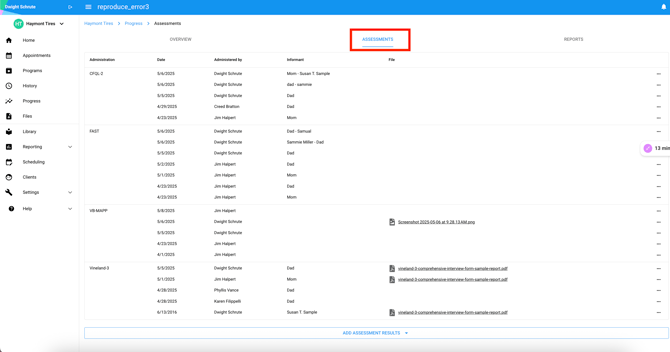
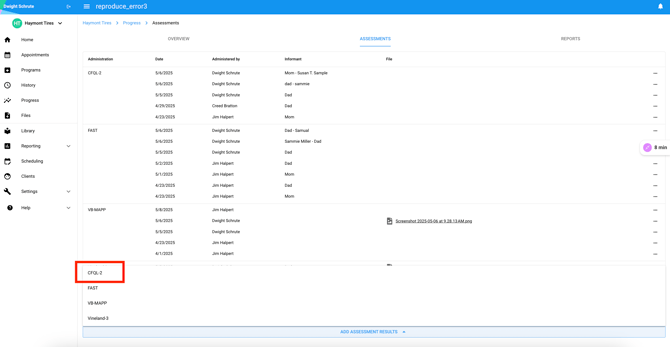
4. Click [Add Assessment Results] at the bottom of the page.

5. Select [CFQL-2] from the dropdown menu
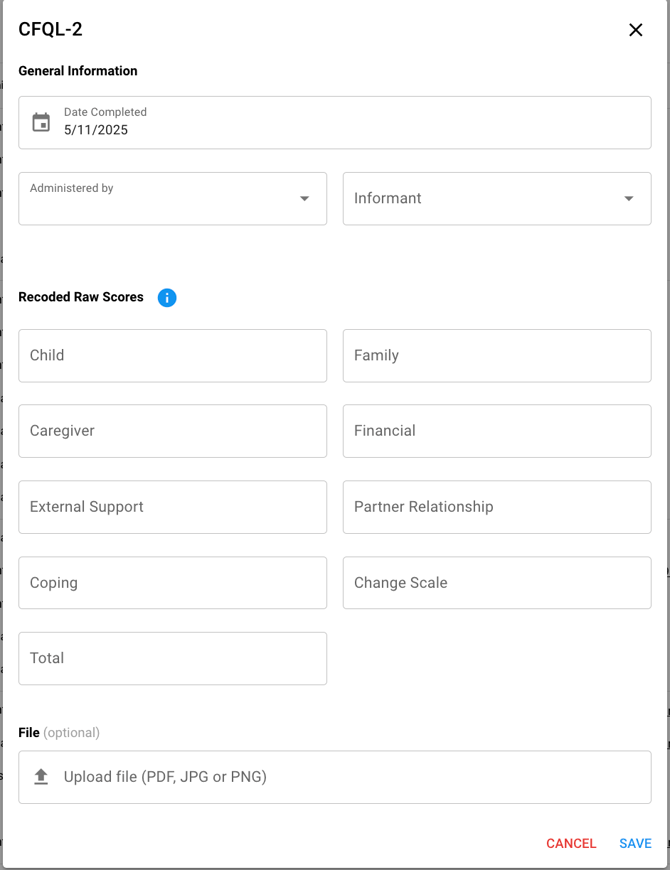
6. Add [General Information]
ℹ️ Note: [Administered by] is the clinician in the system.
[Informant] is the person who completed the assessment, typically a client or their caregiver.
The Date and Informant information will be displayed on the graph.
7. Add the [Recorded Raw Scores]
ℹ️ Note: These are not required fields, so if the parent does not complete a section (example: financial) the clinician is still able to generate a graph with the data points entered.
The Raw Scores will be displayed on the graph.
8. Add a File (optional)
ℹ️ Note: This is for storage purposes only. This file does not generate on the graph or report.
Only one file can be uploaded here. If the clinician has multiple files, combine the files into one PDF, JPG, or PNG and then upload.
For any additional file storage, upload the file within the [Files] tab for that client.
9. Select [Save]
10. Review the Graph
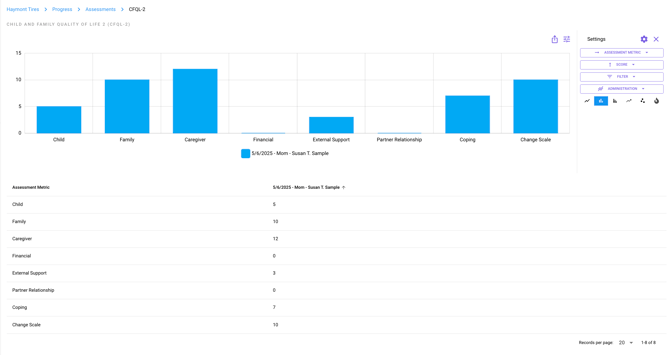
ℹ️ Note: The information on the assessment entry can always be edited. Select the three dots on the right side of the assessment name. Select [edit] then make the changes

📹 Functional Assessment Screening Tool (FAST)
Steps for inputting FAST Scores:
1. Select the client's name. from the drop down in the top left corner.
2. Click the [Progress] tab on the left hand side.
3. Click the [Assessments] tab in the middle of the page.

4. Click [Add Assessment Results] at the bottom of the page

5. Select [FAST] in the drop down menu.
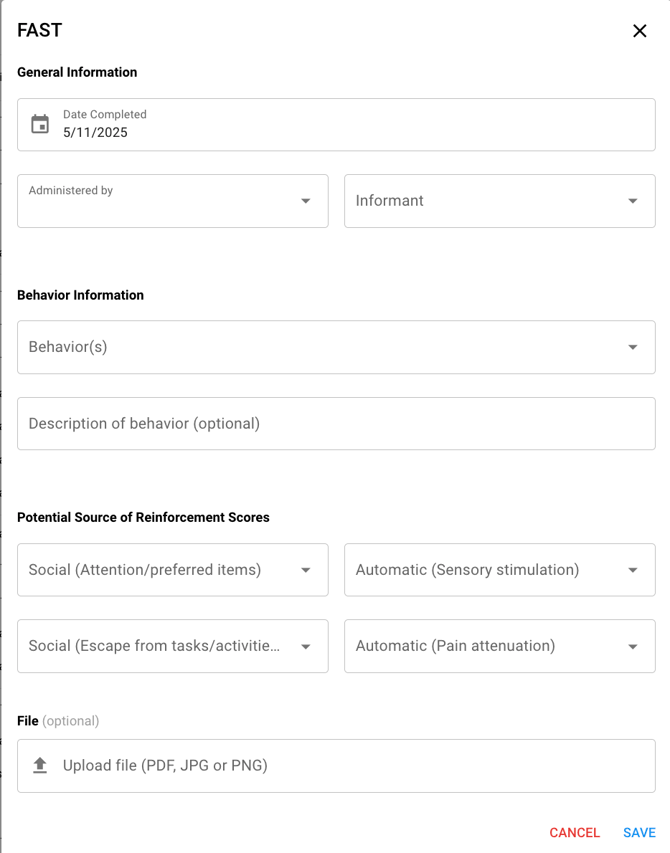
6. Add [General Information]
ℹ️ Note: [Administered by] is the clinician in the system.
[Informant] is the person who completed the assessment, typically a client or their caregiver.
The Date and Informant information will display on the graph.
7. Add [Behavioral Information]
ℹ️ Note: The name of the Behavior is added to the graph.
The Description of the Behavior (optional) is for storing purposes only. This will not display on the graph.
If the clinician is tracking multiple Behaviors, complete an Assessments Results Entry for each Behavior.
8. Add [Potential Source of Reinforcement] Scores
9. Add File (optional)
ℹ️ Note: The optional File add is for storage purposes only. The file uploaded does not generate on the graph or report.
Only one file can be uploaded. If the clinician has multiple files, combine the files into one PDF, JPG, or PNG and then upload.
For any additional file storage, upload the file within the [Files] tab for that client.
10. Select [Save]
11. Review the graph
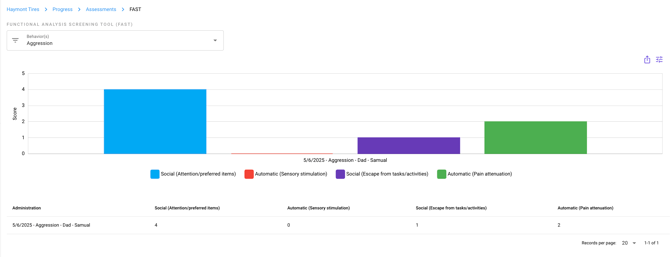
ℹ️ Note: The information on the assessment entry can always be edited. Select the three dots on the right side of the assessment name. Select [edit] then make the changes
📹The Inventory of Good Learner Repertoires (IGLR)
Steps for inputting IGLR Scores:
1. Select the client's name from the drop down in the top left corner.
2. Click the [Progress] tab on the left hand side.
3. Click the [Assessments] tab in the middle of the page.

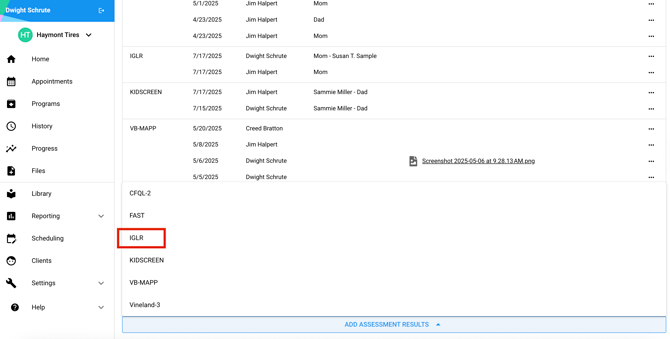
4. Click [Add Assessment Results] at the bottom of the page.

5. Select [IGLR] from the drop down menu.
6. Add [General Information]
ℹ️ [Administered by] is the clinician in the system.
The Date will display on the graph.
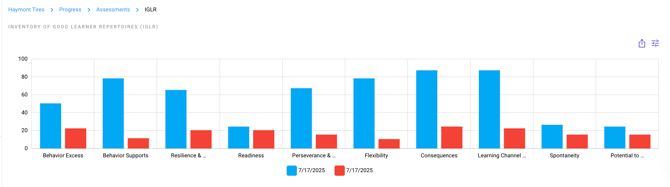
7. Add [Percentile Scores]
ℹ️ There are 10 fields, [Behavior Excess], [Behavior Supports], [Resilience & Regulation], [Readiness], [Perseverance & Focus], [Flexibility], [Consequences], [Learning Channel Preferences], [Spontaneity], [Potential to Benefit from Inclusion]. If the clinician only completed 7 of the 10 fields, leave the remaining fields blank.
These scores will display on the graph.
8. Add [File] (Optional)
ℹ️ Note: The optional File add is for storage purposes only. This Image does not generate on the graph or report.
Only one file can be uploaded here. If the clinician has multiple files, combine the files into one PDF, JPG, or PNG and then upload.
For any additional file storage, upload the file within the [Files] tab for that client.

9. Select [Save]
10. Review the graph
ℹ️ Note: The information on the assessment entry can always be edited. Select the three dots on the right side of the assessment name. Select [edit] then make the changes
📹KIDSCREEN
Steps for inputting KIDSCREEN Scores:
1. Select the client's name from the drop down in the top left corner.
2. Click the [Progress] tab on the left hand side.
3. Click the [Assessments] tab in the middle of the page.
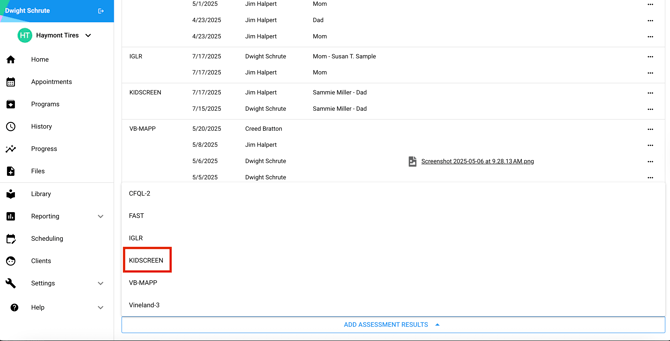
4. Click [Add Assessment Results] at the bottom of the page.
5. Select [KIDSCREEN] from the drop down menu.
6. Add [General Information]
ℹ️ [Administered by] is the clinician in the system.
The Date will display on the graph.
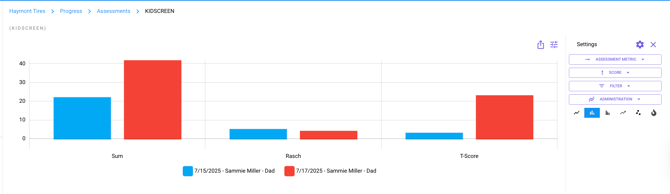
7. Add [Scores]
ℹ️ There are 3 fields, [Sum], [Rasch], [T-Scores]
These scores will display on the graph.
8. Add [File] (Optional)
ℹ️ Note: The optional File add is for storage purposes only. This Image does not generate on the graph or report.
Only one file can be uploaded here. If the clinician has multiple files, combine the files into one PDF, JPG, or PNG and then upload.
For any additional file storage, upload the file within the [Files] tab for that client.
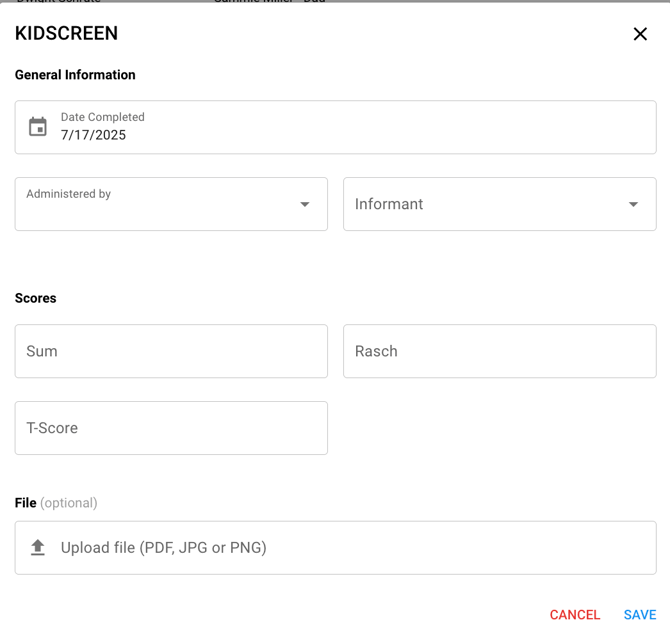
9. Select [Save]
10. Review the graph
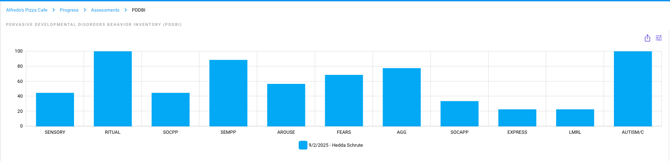
📹Pervasive Developmental Disorder Behavior Inventory (PDDBI)
Steps for inputting PDDBI Scores:
1. Select the client's name from the drop down in the top left corner.
2. Click the [Progress] tab on the left hand side.
3. Click the [Assessments] tab in the middle of the page.
4. Click [Add Assessment Results] at the bottom of the page.
5. Select [PDDBI] from the drop-down menu

6. Add [General Information]
ℹ️ [Administered by] is the clinician in the system.
The Date & Informant will display on the graph.
7. Add [T-Scores]

8. Add [File] (Optional)
ℹ️ Note: The optional File add is for storage purposes only. This Image does not generate on the graph or report.
Only one file can be uploaded here. If the clinician has multiple files, combine the files into one PDF, JPG, or PNG and then upload.
For any additional file storage, upload the file within the [Files] tab for that client.
9. Click [Save}
10. Review Graph
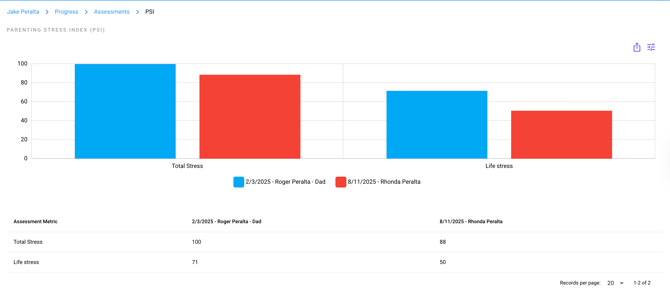
📹 Parent Stress Index (PSI)
Steps for inputting PSI Scores:
1. Select the client's name from the drop down in the top left corner.
2. Click the [Progress] tab on the left hand side.
3. Click the [Assessments] tab in the middle of the page.
4. Click [Add Assessment Results] at the bottom of the page.
5. Select [PSI] from the drop-down menu.
6. Add [General Information]
ℹ️ [Administered by] is the clinician in the system.
The Date & Informant will display on the graph.
7. Add [Percentile Scores]
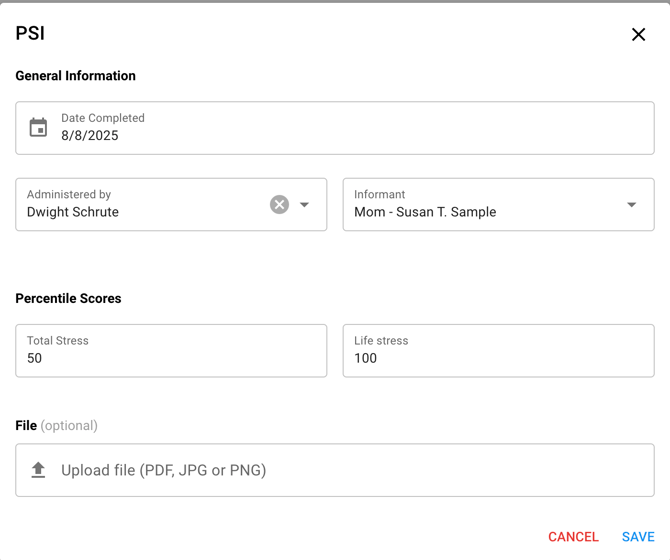
8. Add [File] (Optional)
ℹ️ Note: The optional File add is for storage purposes only. This Image does not generate on the graph or report.
Only one file can be uploaded here. If the clinician has multiple files, combine the files into one PDF, JPG, or PNG and then upload.
For any additional file storage, upload the file within the [Files] tab for that client.
9. Click [Save}
10. Review Graph
📹 Verbal Behavior Milestones Assessment and Placement Program (VB-MAPP)
Steps for inputting VB-MAPP Scores:
1. Select the client's name from the drop down in the top left corner.
2. Click the [Progress] tab on the left hand side.
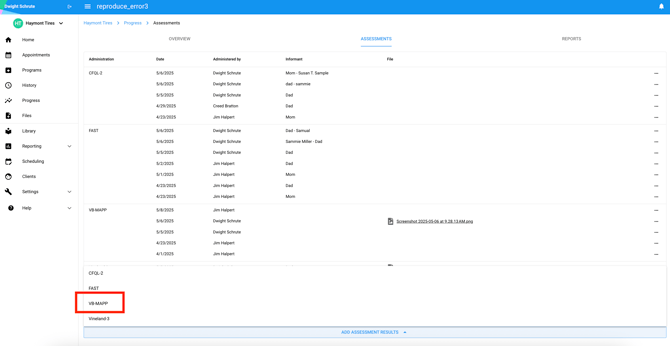
3. Click the [Assessments] tab in the middle of the page.
4. Click [Add Assessment Results] at the bottom of the page.
5. Select [VB-MAPP] from the drop down menu.
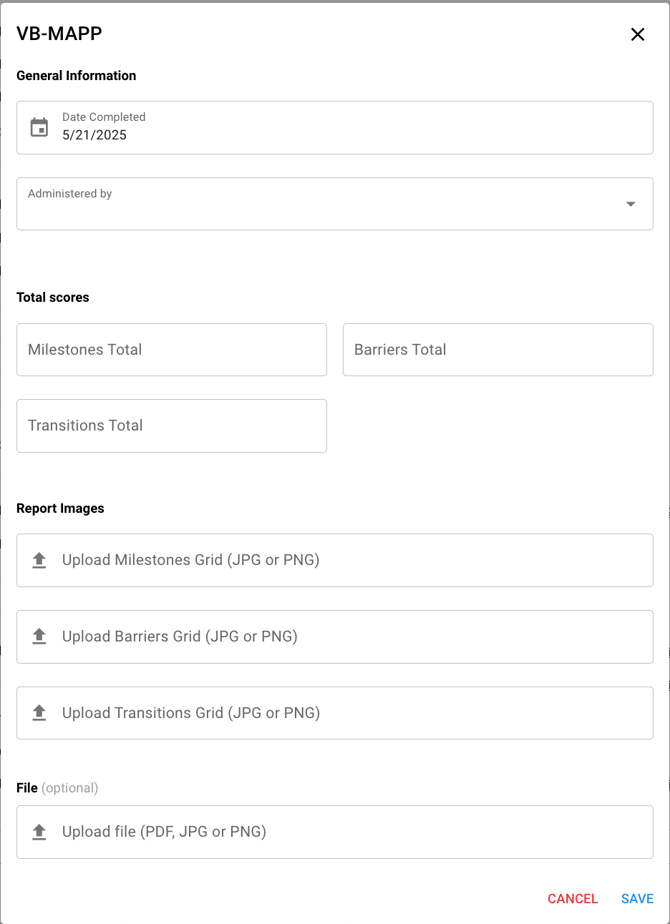
6. Add [General Information]
ℹ️ [Administered by] is the clinician in the system.
The Date will display on the graph.
7. Add [Total Scores]
ℹ️ There are 3 fields, [Milestones], [Transitions], and [Barriers]. If the clinician only completed 1 of the 3 fields, leave the remaining fields blank.
These scores will display on the graph.
8. Add [Report Images]
ℹ️ These images can be displayed on the Learner's Report. For a step-by-step guide on how to add report images to a Report, see our KB article HERE
9. Add [File] (Optional)
ℹ️ Note: The optional File add is for storage purposes only. This Image does not generate on the graph or report.
Only one file can be uploaded here. If the clinician has multiple files, combine the files into one PDF, JPG, or PNG and then upload.
For any additional file storage, upload the file within the [Files] tab for that client.
10. Select [Save]
11. Review the graph
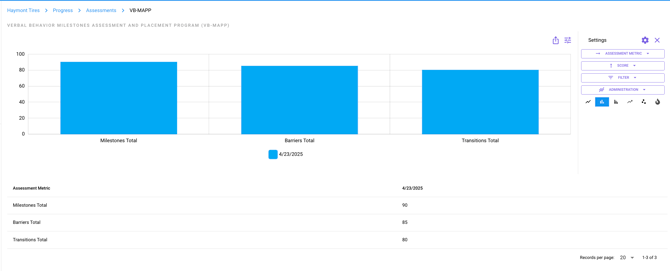
ℹ️ Note: The information on the assessment entry can always be edited. Select the three dots on the right side of the assessment name. Select [edit] then make the changes
📹 Vineland-3
Steps for inputting Vineland-3 Scores:
1. Select the client's name from the drop down in the top left corner.
2. Click the [Progress] tab on the left hand side.
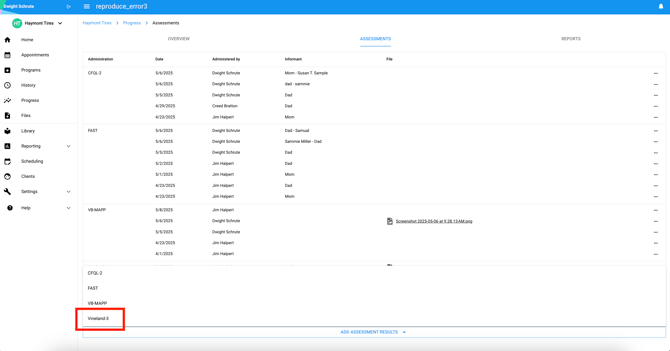
3. Click the [Assessments] tab in the middle of the page.

4. Click the [Add Assessment Results] tab at the bottom of the page.
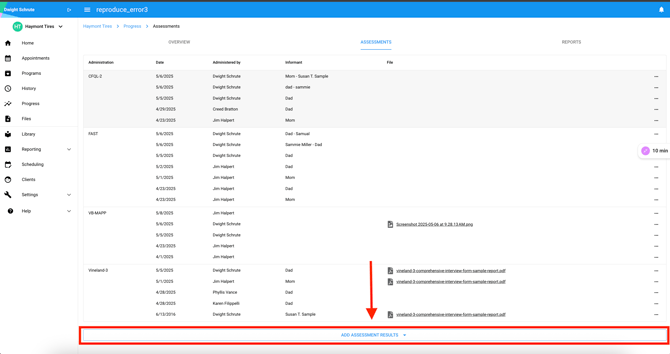
5. Select the [Vineland-3] in the drop down menu.
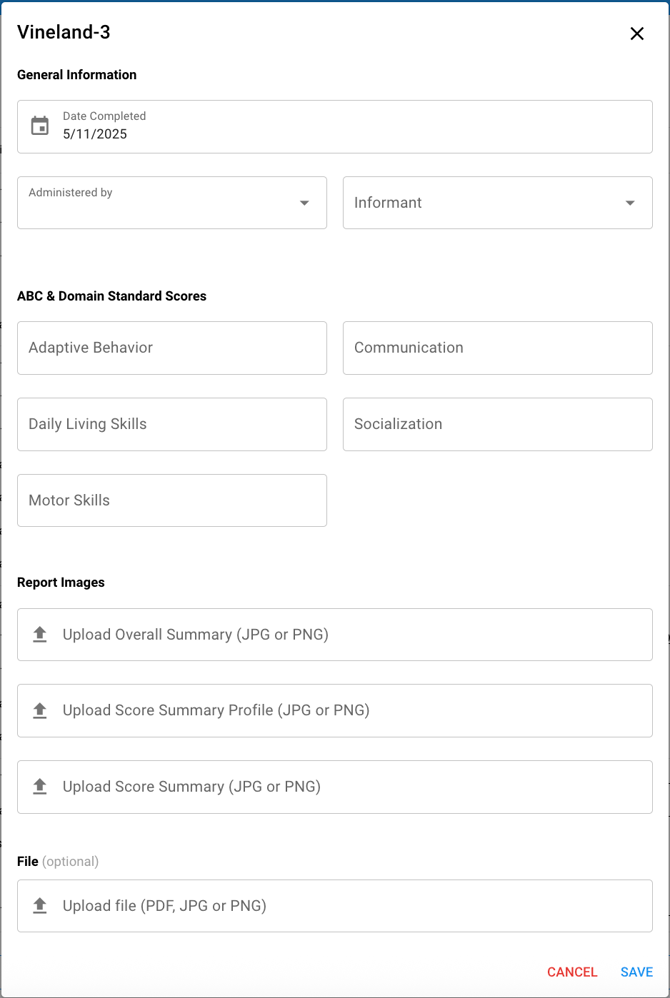
6. Add [General Information]
Note: [Administered by] is the clinician in the system.
[Informant] is the person who completed the assessment, typically a client, teacher, or caregiver.
7. Add [ABC & Domain Standard Scores]
8. Add [Report Images]
ℹ️ These images can be displayed on the Learner's Report. For a step-by-step guide on how to add report images to a Report, see our KB article HERE
9. Add [File] (Optional)
ℹ️ Note: The Report Images & File add is for storage purposes only. These Images do not generate on the graph or report.
If the clinician has multiple files to upload, combine the files into one JPG, PNG, or PDF (PDF is in File section only) and then upload.
For any additional file storage, upload the file within the [Files] tab for that client.
10. Select [Save]
11. Review the graph
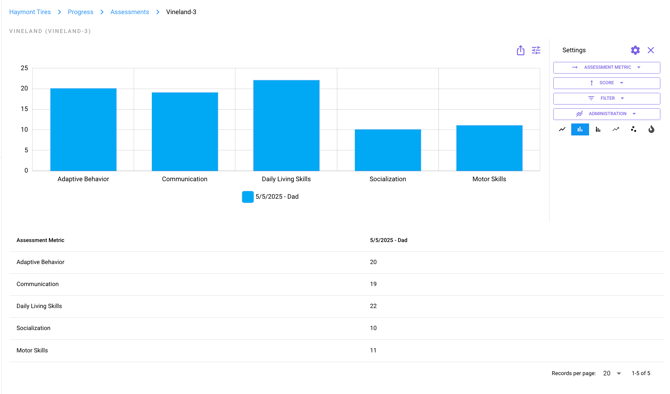
ℹ️ Note: The information on the assessment entry can always be edited. Select the three dots on the right side of the assessment name. Select [edit] then make the changes
ABLLS-R
CAUTION: ABLLS was not intended to be scored as an X/544 score. However, to ensure that clinicians have the ability to document their assessment scored, Hi Rasmus has selected a total score of 544. Each item can be given a score of .25, .5. .75, or 1.
1. Select the client's name from the drop down in the top left corner.
2. Click the [Progress] tab on the left hand side.
3. Click the [Assessments] tab in the middle of the page.
4. Click [Add Assessment Results] at the bottom of the page.
5. Select [ABLLS-R] from the dropdown menu 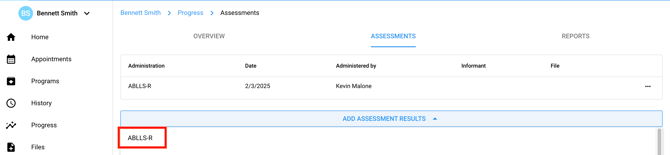
6. Add [General Information]
Note: [Administered by] is the clinician in the system.
7. Add [ABLLS-R Section Scores] 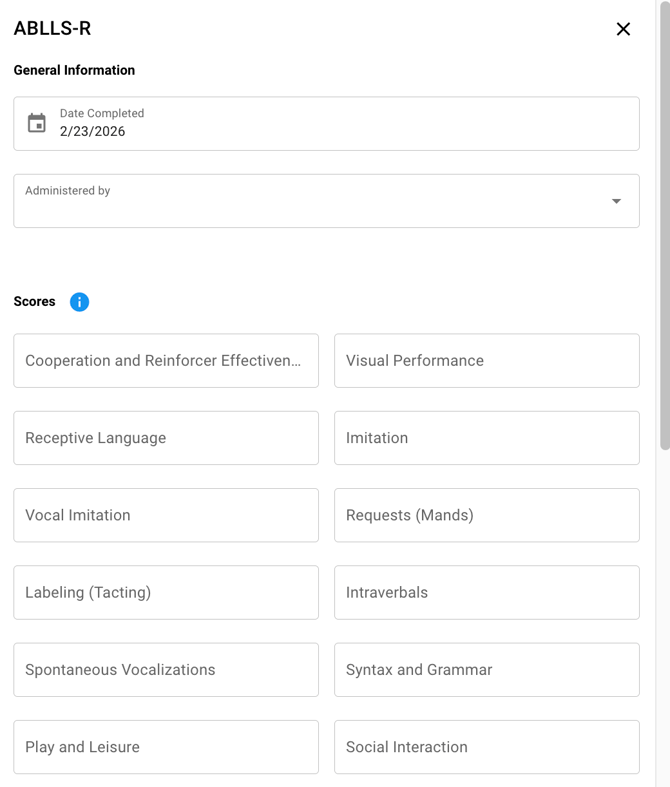
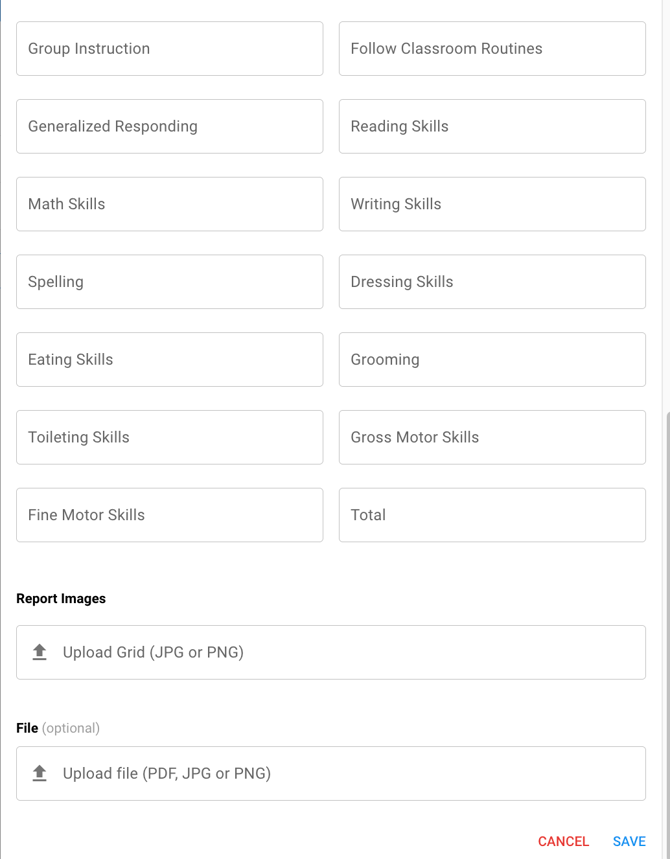
8. Add [Report Images]
ℹ️ These images can be displayed on the Learner's Report. For a step-by-step guide on how to add report images to a Report, see our KB article HERE
9. Add [File] (Optional)
ℹ️ Note: The Report Images & File add is for storage purposes only. These Images do not generate on the graph or report.
If the clinician has multiple files to upload, combine the files into one JPG, PNG, or PDF (PDF is in File section only) and then upload.
For any additional file storage, upload the file within the [Files] tab for that client.
10. Select [Save]
11. Review the graph 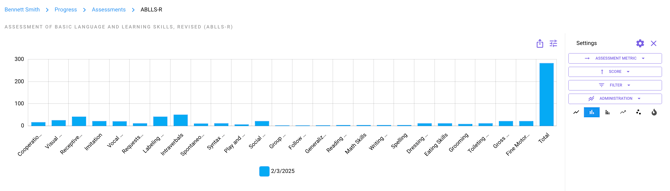
The Total Score field is not auto-calculated.
Users are responsible for manually adding the final score before saving.
AFLS (Basic Living Skills, Community Participation, Home Skills, Independent Living Skills, School Skills and Vocational Skills)
Disclaimer: The AFLS was not originally designed to be scored using overall “totals.” However, if your team prefers to display totals, this functionality is available as an option within the platform.
1. Select the client's name from the drop down in the top left corner.
2. Click the [Progress] tab on the left hand side.
3. Click the [Assessments] tab in the middle of the page.
4. Click [Add Assessment Results] at the bottom of the page.
5. Select one of the [AFLS] options from the dropdown menu 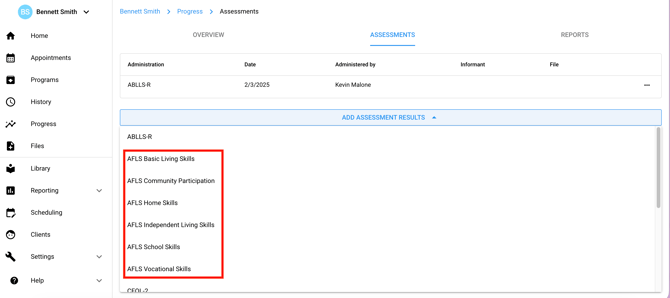
6. Add [General Information]
Note: [Administered by] is the clinician in the system.
[Informant] is the person who completed the assessment, typically a client, teacher, or caregiver.
7. Add appropriate [AFLS Scores] 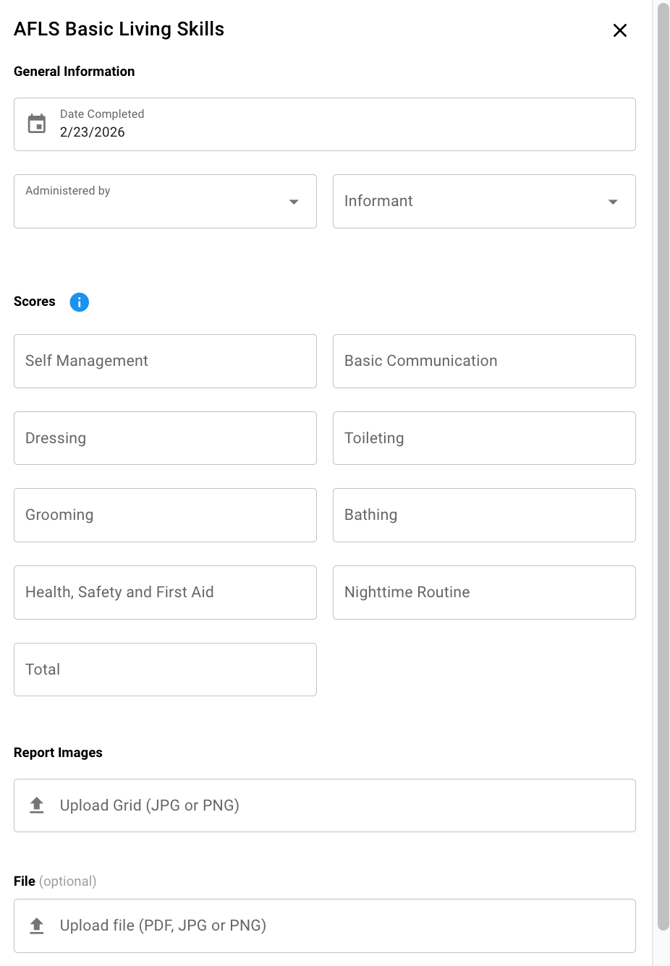
8. Add [Report Images]
ℹ️ These images can be displayed on the Learner's Report. For a step-by-step guide on how to add report images to a Report, see our KB article HERE
9. Add [File] (Optional)
ℹ️ Note: The Report Images & File add is for storage purposes only. These Images do not generate on the graph or report.
If the clinician has multiple files to upload, combine the files into one JPG, PNG, or PDF (PDF is in File section only) and then upload.
For any additional file storage, upload the file within the [Files] tab for that client.
10. Select [Save]
11. Review the graph
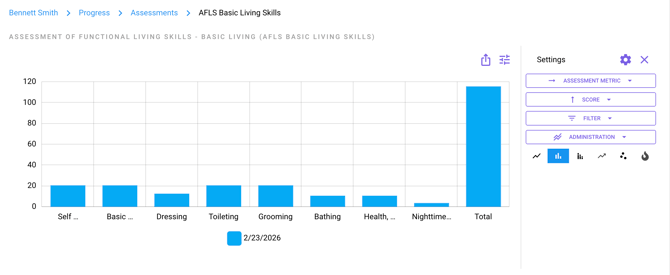
The Total Score field is not auto-calculated.
Users are responsible for manually adding the final score before saving.
ℹ️ Check out our KB Article on how to Add Assessment Results into Reports