---
title: Frequency and Rate Data Collection
description: Frequency-based programs allow you to set goals for specific behaviors and work on either increasing or decreasing their frequency.
---
[Skip to content](https://help.hirasmus.com/knowledge/behavior-frequency-programs#main-content)
English
Show submenu for translations
[Request Support](https://help.hirasmus.com/knowledge/kb-tickets/new?hsLang=en) [Customer portal](https://help.hirasmus.com/helpdesk?hsLang=en)

Open main navigation
Close main navigation
- English
Show submenu for translations
- [Request Support](https://help.hirasmus.com/knowledge/kb-tickets/new)
- [Customer portal](https://help.hirasmus.com/helpdesk)
- hirasmus.com
hirasmus.com
Hi! How can we help you?
- There are no suggestions because the search field is empty.
1. [Hi Rasmus Help Center](https://help.hirasmus.com/knowledge?hsLang=en)
2. [Creating Programs](https://help.hirasmus.com/knowledge/creating-programs?hsLang=en)
3. [Creating Programs by Type](https://help.hirasmus.com/knowledge/creating-programs?hsLang=en#creating-programs-by-type)
September 18, 2026
# Frequency and Rate Data Collection
## Frequency programs and frequency and rate target types allow you to set goals for specific behaviors and work on either increasing or decreasing their frequency.
When building rate or frequency programs, you can customize the data collection several ways to ensure you're capturing the data that matters to you. The Frequency program type will keep track of both prompt counts and duration when collecting data and automatically chart data by frequency (count) and rate over time. The Frequency Target type will collect only frequency data, no rate. There is no associated timer. The rate target type will allow you to collect rate data with specific timer, measurement, and workflow settings.
[Set up A Frequency Program](https://help.hirasmus.com/knowledge/behavior-frequency-programs#frequency-program)
[Set up a Frequency Target Type](https://help.hirasmus.com/knowledge/behavior-frequency-programs#frequency-target)
[Set up a Rate Target Type](https://help.hirasmus.com/knowledge/behavior-frequency-programs#rate-target)
### Set up a Frequency Program
From your client programs page or the library:
- Select **\[Programs\]**
- **\[Add Program\]**
- Select **\[Frequency\]**
The basic setup of frequency-based programs is similar to [Skill acquisition programs](https://help.hirasmus.com/knowledge/skill-acquisition-programs?hsLang=en). The primary difference is your measurement, prompt level template, and timer option on the data recording tab. See each section below for more information!
#### Choose your measurement:
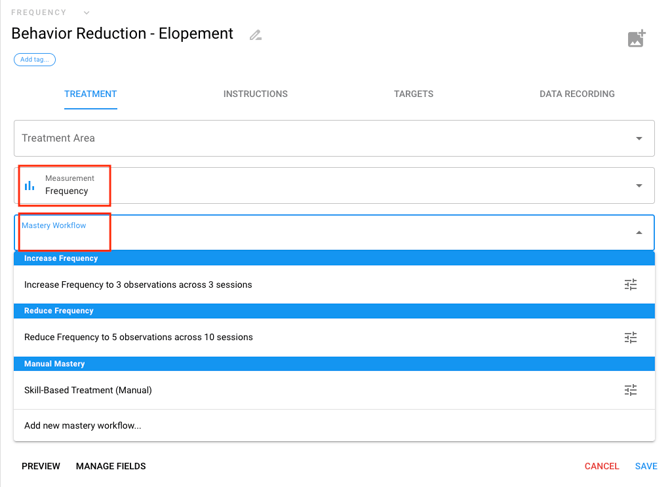
The default measurement for a Frequency Program is **Frequency**. Using Frequency as the measurement will:
- Show *Increase Frequency* and *Reduce Frequency* Mastery Workflows
- Change the default graph settings to *learning opps count* on the y-axis (total number of instances of the behavior recorded)
#### Choose a Prompt Level Template
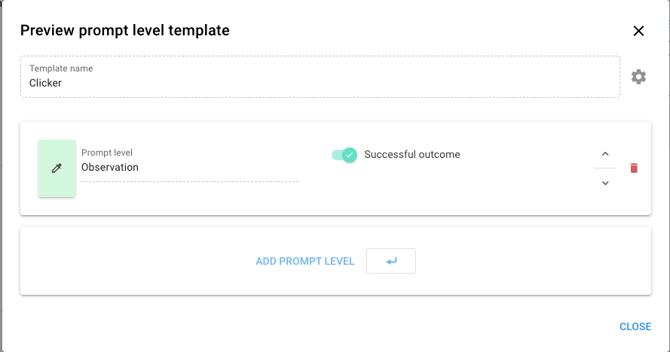
On the data recording tab, choose a "Clicker" prompt level template. This will allow you to click once to record an instance of the behavior.
#### Choose Timer Settings
On the Data Recording tab, you can select **\[Sync Timer with Session Duration\].** If this is checked, the timer will automatically link with the session timer. If this is un-checked, you will need to manually start the timer during the session to begin collecting frequency data.
Note: if you [pin a program](https://help.hirasmus.com/knowledge/pin-programs?hsLang=en) to the top of the session, it will automatically sync the timer with the session timer
Tip: Recording Zero Occurrences of a Behavior
To ensure that data will be recorded even when there is no occurrences of the behavior, you need to make sure that the timer for the Frequency program is running. An easy way to do this is by syncing your timer with the session duration!
#### Running a frequency-based program
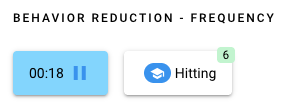
In a session, press the timer icon to start the timer (if tied to the session timer, it will start running automatically)
Click the target to record an instance of the behavior. The count will appear in the top right corner of the target
### Frequency Target Type
Frequency target types allow you to collect true frequency data. There is no timer attached, and calculating rate is not supported.
To use the Frequency target type, follow these steps:
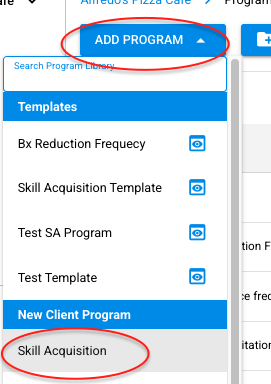
1\. Click \[Add Program\] and select a \[Skill Acquisition\] program.
2\. Select \[Frequency\] as the measurement type on the Treatment tab.
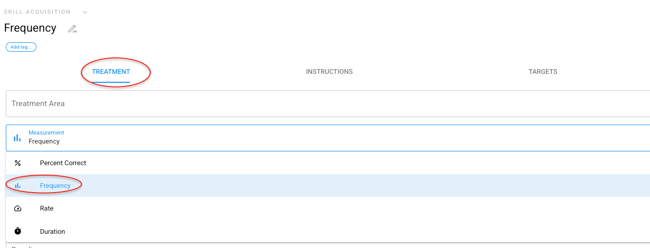
3\. Navigate to the Targets tab and select \[Add Target\]. Fill in the title for your target.
4\. Change the target type from Discrete Trial to Frequency using the dropdown menu.
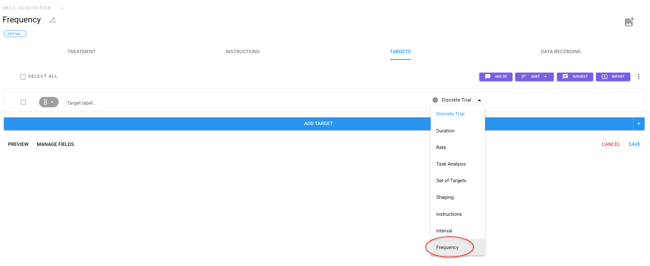
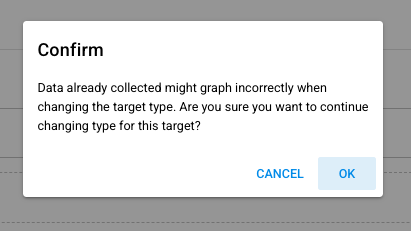
5\. When you select Frequency, you will see a modal that asks you to confirm that you want to change the target type. Click \[OK\].
6\. The target settings will appear. Choose your Prompt Level Template and Workflow for the target. Measurement is locked into Frequency and cannot be changed.
Use a Clicker Prompt Level Template to accurately collect frequency data. Workflow options will be limited to match the frequency measurement type.
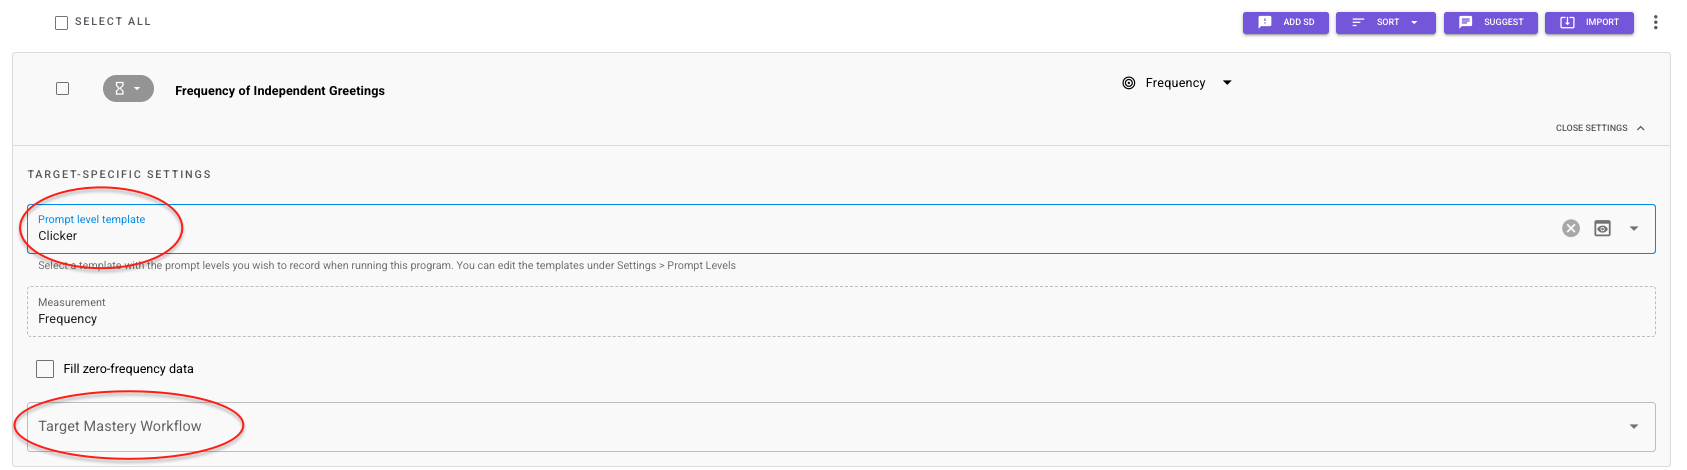
TIP: Target level settings will override program level settings. Your target will follow the specified Workflow and Prompt Level Template within the target rather than the ones selected at the program level.
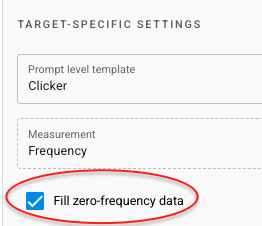
7\. Check the box for \[Fill zero-frequency data\] if you would like to record zeros for this target.
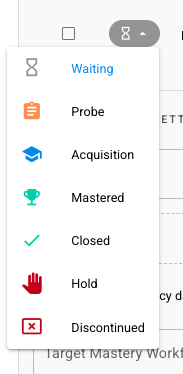
8\. Set the target status as needed. Remember: statuses for Waiting, Closed, Hold, and Discontinued will not be available for data collection in session.
9\. You will need to select a Prompt Level Template on the Data Recording Tab in order to save the program.
10\. Click \[Save\]. Add the program to a session to begin collecting data, if desired.
### **Rate Target Type**
The Rate Target type will allow you to collect rate data and select the direction of your timer.
1\. Click \[Add Program\] and select a \[Skill Acquisition\] program.

2\. Select \[Frequency\] or \[Rate\] as the measurement type on the Treatment tab.
The Rate Target type will allow you to view either rate or frequency on the graph by changing the graph settings.
3\. Navigate to the Targets tab and select \[Add Target\]. Fill in the title for your target.
4\. Change the target type from Discrete Trial to Rate using the dropdown menu.
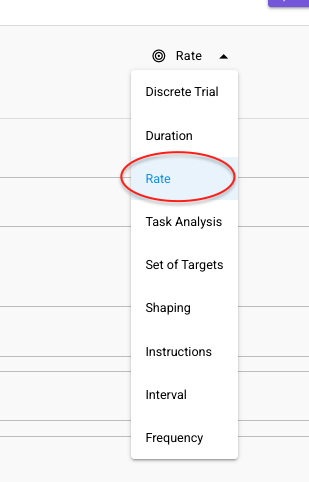
5\. When you select Rate, you will see a modal that asks you to confirm that you want to change the target type. Click \[OK\].

6\. The target settings will appear. Choose your Prompt Level Template and Workflow for the target.
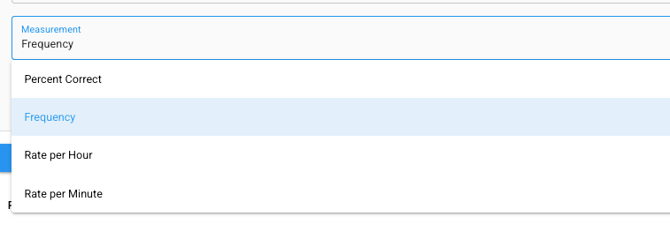
7\. You will also select the measurement type for the target. Generally, you would likely select a Rate per hour or minute, though some programs may call for different measurement types.
8\. Choose your timer type.
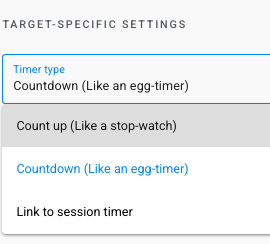
9\. Set the target status as needed. Remember: statuses for Waiting, Closed, Hold, and Discontinued will not be available for data collection in session.

10\. You will need to select a Prompt Level Template on the Data Recording Tab in order to save the program.
11\. Click \[Save\]. Add the program to a session to begin collecting data, if desired.
Frequency and rate programs on a graph: [Click here to learn more!](https://help.hirasmus.com/knowledge/navigating-graph-settings?hsLang=en#D)
- [Getting Started](https://help.hirasmus.com/knowledge/getting-started?hsLang=en#main-content)
- [Quickstart Guide](https://help.hirasmus.com/knowledge/getting-started?hsLang=en#quickstart-guide)
- [Hi Rasmus 101: Using Hi Rasmus as a Behavior Technician](https://help.hirasmus.com/knowledge/getting-started?hsLang=en#hi-rasmus-101-using-hi-rasmus-as-a-behavior-technician)
- [Hi Rasmus 201: Hi Rasmus Guide for BCBAs / Behavior Analysts](https://help.hirasmus.com/knowledge/getting-started?hsLang=en#hi-rasmus-201-hi-rasmus-guide-for-bcbas-behavior-analysts)
- [Hi Rasmus 101: Using Hi Rasmus in a Multi-Disciplinary Setting](https://help.hirasmus.com/knowledge/getting-started?hsLang=en#hi-rasmus-101-using-hi-rasmus-in-a-multi-disciplinary-setting)
- [Managing Clients & Users](https://help.hirasmus.com/knowledge/managing-clients-users?hsLang=en#main-content)
- [Managing Clients](https://help.hirasmus.com/knowledge/managing-clients-users?hsLang=en#managing-clients)
- [Managing Users](https://help.hirasmus.com/knowledge/managing-clients-users?hsLang=en#managing-users)
- [Client \<\> User Access](https://help.hirasmus.com/knowledge/managing-clients-users?hsLang=en#client-user-access)
- [User Privileges](https://help.hirasmus.com/knowledge/managing-clients-users?hsLang=en#user-privileges)
- [Multi-factor Authentication (MFA)](https://help.hirasmus.com/knowledge/managing-clients-users?hsLang=en#multi-factor-authentication-mfa)
- [Single Sign On](https://help.hirasmus.com/knowledge/managing-clients-users?hsLang=en#single-sign-on)
- [Staff Licenses](https://help.hirasmus.com/knowledge/staff-licenses?hsLang=en)
- [Creating Programs](https://help.hirasmus.com/knowledge/creating-programs?hsLang=en#main-content)
- [Your Program Library](https://help.hirasmus.com/knowledge/creating-programs?hsLang=en#your-program-library)
- [Program Setup: Prompt Levels and Workflows](https://help.hirasmus.com/knowledge/creating-programs?hsLang=en#program-setup-prompt-levels-and-workflows)
- [Program Setup: Program Building Blocks](https://help.hirasmus.com/knowledge/creating-programs?hsLang=en#program-setup-program-building-blocks)
- [Creating Programs by Type](https://help.hirasmus.com/knowledge/creating-programs?hsLang=en#creating-programs-by-type)
- [Specific Program Capabilities](https://help.hirasmus.com/knowledge/creating-programs?hsLang=en#specific-program-capabilities)
- [Featured Programs and Library Catalog](https://help.hirasmus.com/knowledge/creating-programs?hsLang=en#featured-programs-and-library-catalog)
- [Client Progress](https://help.hirasmus.com/knowledge/client-progress?hsLang=en#main-content)
- [Reviewing Client Data](https://help.hirasmus.com/knowledge/client-progress?hsLang=en#reviewing-client-data)
- [Program Modifications](https://help.hirasmus.com/knowledge/client-progress?hsLang=en#program-modifications)
- [Client Progress Reports](https://help.hirasmus.com/knowledge/client-progress?hsLang=en#client-progress-reports)
- [Assessment Results](https://help.hirasmus.com/knowledge/client-progress?hsLang=en#assessment-results)
- [Exporting Data](https://help.hirasmus.com/knowledge/client-progress?hsLang=en#exporting-data)
- [Operational Tools, Reporting and Auditing](https://help.hirasmus.com/knowledge/operational-tools-reporting-and-auditing?hsLang=en#main-content)
- [Single Client Reporting / Auditing](https://help.hirasmus.com/knowledge/operational-tools-reporting-and-auditing?hsLang=en#single-client-reporting-auditing)
- [Cross Client Reporting / Auditing (Premium)](https://help.hirasmus.com/knowledge/operational-tools-reporting-and-auditing?hsLang=en#cross-client-reporting-auditing-premium)
- [Activity Time Change Requests](https://help.hirasmus.com/knowledge/operational-tools-reporting-and-auditing?hsLang=en#activity-time-change-requests)
- [Sessions](https://help.hirasmus.com/knowledge/sessions?hsLang=en#main-content)
- [Setting Up a Client Session](https://help.hirasmus.com/knowledge/sessions?hsLang=en#setting-up-a-client-session)
- [Running a Client Session](https://help.hirasmus.com/knowledge/sessions?hsLang=en#running-a-client-session)
- [Completing Session Notes](https://help.hirasmus.com/knowledge/sessions?hsLang=en#completing-session-notes)
- [Group Sessions](https://help.hirasmus.com/knowledge/sessions?hsLang=en#group-sessions)
- [Reviewing and Editing Sessions / Activities](https://help.hirasmus.com/knowledge/sessions?hsLang=en#reviewing-and-editing-sessions-activities)
- [Supervision Mode](https://help.hirasmus.com/knowledge/supervision-mode?hsLang=en#main-content)
- [Supervision Criteria](https://help.hirasmus.com/knowledge/supervision-mode?hsLang=en#supervision-criteria)
- [Supervising Live Sessions](https://help.hirasmus.com/knowledge/supervision-mode?hsLang=en#supervising-live-sessions)
- [Supervision Session Notes](https://help.hirasmus.com/knowledge/supervision-mode?hsLang=en#supervision-session-notes)
- [Templates](https://help.hirasmus.com/knowledge/templates?hsLang=en#main-content)
- [Session Notes](https://help.hirasmus.com/knowledge/templates?hsLang=en#session-notes)
- [Forms](https://help.hirasmus.com/knowledge/templates?hsLang=en#forms)
- [Treatment Plans and Progress Reports](https://help.hirasmus.com/knowledge/templates?hsLang=en#treatment-plans-and-progress-reports)
- [Activity Types](https://help.hirasmus.com/knowledge/templates?hsLang=en#activity-types)
- [Integrations](https://help.hirasmus.com/knowledge/integrations?hsLang=en#main-content)
- [Aloha ABA Integration](https://help.hirasmus.com/knowledge/integrations?hsLang=en#aloha-aba-integration)
- [Aloha Integration: FAQ And Troubleshooting](https://help.hirasmus.com/knowledge/integrations?hsLang=en#aloha-integration-faq-and-troubleshooting)
- [Lumary Integration: Overview](https://help.hirasmus.com/knowledge/integrations?hsLang=en#lumary-integration-overview)
- [Lumary Integration: Set Up](https://help.hirasmus.com/knowledge/integrations?hsLang=en#lumary-integration-set-up)
- [Lumary Integration: Running and Reviewing Sessions](https://help.hirasmus.com/knowledge/integrations?hsLang=en#lumary-integration-running-and-reviewing-sessions)
- [Lumary Integration: FAQ and Troubleshooting](https://help.hirasmus.com/knowledge/integrations?hsLang=en#lumary-integration-faq-and-troubleshooting)
- [Boost Integration: Overview](https://help.hirasmus.com/knowledge/integrations?hsLang=en#boost-integration-overview)
- [Boost Integration: Set Up](https://help.hirasmus.com/knowledge/integrations?hsLang=en#boost-integration-set-up)
- [Boost Integration: Running and Reviewing Sessions](https://help.hirasmus.com/knowledge/integrations?hsLang=en#boost-integration-running-and-reviewing-sessions)
- [Boost Integration: FAQ and Troubleshooting](https://help.hirasmus.com/knowledge/integrations?hsLang=en#boost-integration-faq-and-troubleshooting)
- [Camber Integration: Overview](https://help.hirasmus.com/knowledge/integrations?hsLang=en#camber-integration-overview)
- [Camber Integration: Set up](https://help.hirasmus.com/knowledge/integrations?hsLang=en#camber-integration-set-up)
- [Camber: Running and Reviewing Sessions](https://help.hirasmus.com/knowledge/integrations?hsLang=en#camber-running-and-reviewing-sessions)
- [Camber: FAQ and Troubleshooting](https://help.hirasmus.com/knowledge/integrations?hsLang=en#camber-faq-and-troubleshooting)
- [TherapyPM](https://help.hirasmus.com/knowledge/integrations?hsLang=en#therapypm)
- [Offline Mode](https://help.hirasmus.com/knowledge/offline-mode?hsLang=en)
- [Parents](https://help.hirasmus.com/knowledge/parents?hsLang=en)
- [RBT Training](https://help.hirasmus.com/knowledge/rbt-training?hsLang=en)
- [Outcomes](https://help.hirasmus.com/knowledge/outcomes?hsLang=en#main-content)
- [Data Accessibility](https://help.hirasmus.com/knowledge/outcomes?hsLang=en#data-accessibility)
- [AI](https://help.hirasmus.com/knowledge/ai?hsLang=en#main-content)
- [AI Note Auditor](https://help.hirasmus.com/knowledge/ai?hsLang=en#ai-note-auditor)
- [Scheduling](https://help.hirasmus.com/knowledge/scheduling?hsLang=en#main-content)
- [🏁 Scheduling: Getting Started](https://help.hirasmus.com/knowledge/scheduling?hsLang=en#scheduling-getting-started)
- [🛠️ Scheduling: Set Up](https://help.hirasmus.com/knowledge/scheduling?hsLang=en#%EF%B8%8F-scheduling-set-up)
- [⚙️ Scheduling: Calendar Views and Settings](https://help.hirasmus.com/knowledge/scheduling?hsLang=en#%EF%B8%8F-scheduling-calendar-views-and-settings)
- [📆 Scheduling: Creating and Updating Appointments and Events](https://help.hirasmus.com/knowledge/scheduling?hsLang=en#scheduling-creating-and-updating-appointments-and-events)
- [✅ Scheduling: Completing Scheduled Appointments](https://help.hirasmus.com/knowledge/scheduling?hsLang=en#scheduling-completing-scheduled-appointments)
- [📈 Scheduling: Appointments Reporting](https://help.hirasmus.com/knowledge/scheduling?hsLang=en#scheduling-appointments-reporting)
- [Frequently Asked Questions](https://help.hirasmus.com/knowledge/frequently-asked-questions?hsLang=en#main-content)
- [Subscription and Invoices](https://help.hirasmus.com/knowledge/frequently-asked-questions?hsLang=en#subscription-and-invoices)
- [Device and App Info](https://help.hirasmus.com/knowledge/frequently-asked-questions?hsLang=en#device-and-app-info)
- [Recovering Deleted Items](https://help.hirasmus.com/knowledge/frequently-asked-questions?hsLang=en#recovering-deleted-items)
- [Settings](https://help.hirasmus.com/knowledge/settings?hsLang=en)
- [New and Coming Soon!](https://help.hirasmus.com/knowledge/new-and-coming-soon?hsLang=en#main-content)
- [Coming Soon](https://help.hirasmus.com/knowledge/new-and-coming-soon?hsLang=en#coming-soon)
[](https://hirasmus.com)
Help Center
Copyright © 2026, Hi Rasmus Inc.