Duration Programs
No more juggling multiple timers! We have made gathering duration data for one or multiple programs simple and accessible during your sessions.
📹 Watch: Creating Duration Programs
Set up a duration-based program
- From the Library or a Client's Programs Page, select [Add Program] and then [Duration] from the drop down menu

- Enter the program name, instructions, and targets. For more detailed instructions on overall program setup, click here
Quick tip: Add a cover photo
Add a professional, inviting appearance to any of your programs with a cover photo. Simply select the ![]() icon to the right of your program's name, and you can upload a relevant picture. This can make navigating programs from your client's Home page more user-friendly and welcoming.
icon to the right of your program's name, and you can upload a relevant picture. This can make navigating programs from your client's Home page more user-friendly and welcoming.
Settings specific to Duration Programs - on the [Data Recording] tab:
- Workflow - select a duration workflow for best results. Click here for more information
- Prompt Level Template – We recommend using a "clicker" prompt level template, or a template with just a single prompt level. This will allow you to just click to start the timer and click to end, without bringing up the prompt menu
- Zero duration data - selecting this box will auto-fill a zero on any session where data was not collected. Keeping this box unchecked will only track when data is collected on that target

Running a duration-based program
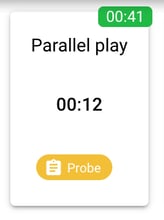
To start the timer while running a session, simply click on the target (if more than one prompt is available, make a prompt level selection). Click again to stop timer. Cumulative duration will be shown in the upper right corner (in green), and the current event duration will be displayed in the center of the target.

📹 Watch: Duration Programs in Action
-Updated October 2025
