Client File Storage and Sharing
Looking for a secure way to store and share client documents, forms, and other important case-related information? Utilize the Client files page!
Uploading a File
Once you are on a client's page, on the left-hand menu, select ![]() Files. Here, you will see a list of documents that have been uploaded to your client's profile or where you can upload if needed.
Files. Here, you will see a list of documents that have been uploaded to your client's profile or where you can upload if needed.


You have the option to add a new folder or new file. You will be able to upload documents and/or pictures across a wide variety of formats directly from your computer.
File Information
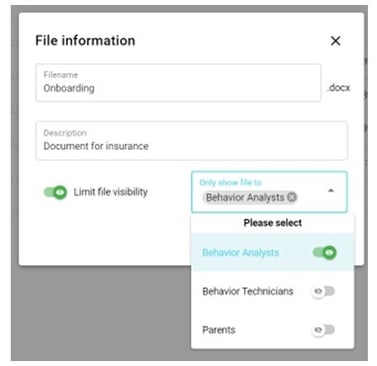
You can add a new file by clicking on  . You can edit information regarding the folder or file by selecting the
 ![]() icon to the right of the folder name.
icon to the right of the folder name.

Here, you can rename a file, add a description, and choose if you would like to limit file visibility to Behavior Analysts, Behavior Technicians, or parents. Once edits have been made, select "Save".
Those who have access to the file will be able to view and download the document by selecting the ![]() icon to the right of the file listing.
icon to the right of the file listing.
Documents may be deleted at any time by selecting ![]() and then
and then ![]() Delete file.
Delete file.
Folder Information
Creating Folders
To create a new folder, click on the blue button "new folder." Give the folder a name.
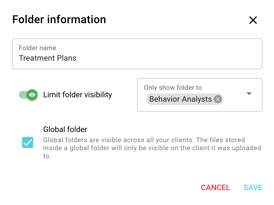
There is an option to limit folder visibility: toggle that switch on and then click who you would like to share the folder with. You can choose to share with the following users: to Behavior Analysts, Behavior Technicians, or parents. If you want to share the folder with all users, leave "limit folder visibility" toggled off.
If you have manager permissions, you have the option to set a folder as global when they add a new folder in the Files section. A global folder will be visible across all clients. The contents within the global folders is still only related to the individual client. This could be useful for organizations when creating a common structure of documents across all clients.

Editing Folders
You can edit a new folder by clicking on the ![]() icon to the right of the folder name. Here, you can rename a folder, and update visibility permissions. Once edits have been made, select "Save".
icon to the right of the folder name. Here, you can rename a folder, and update visibility permissions. Once edits have been made, select "Save".
