---
title: "Tableau Basics: Navigating Your Hi Rasmus Workbook"
description: "This guide covers the basics you'll actually use with your Hi Rasmus workbook in Tableau: getting around, saving your work, exporting data, and filtering down to what matters."
---
[Skip to content](https://help.hirasmus.com/knowledge/tableau-basics-navigating-your-hi-rasmus-workbook#main-content)
English
Show submenu for translations
[Request Support](https://help.hirasmus.com/knowledge/kb-tickets/new?hsLang=en) [Customer portal](https://help.hirasmus.com/helpdesk?hsLang=en)

Open main navigation
Close main navigation
- English
Show submenu for translations
- [Request Support](https://help.hirasmus.com/knowledge/kb-tickets/new)
- [Customer portal](https://help.hirasmus.com/helpdesk)
- hirasmus.com
hirasmus.com
Hi! How can we help you?
- There are no suggestions because the search field is empty.
1. [Hi Rasmus Help Center](https://help.hirasmus.com/knowledge?hsLang=en)
2. [Outcomes](https://help.hirasmus.com/knowledge/outcomes?hsLang=en)
3. [Data Accessibility](https://help.hirasmus.com/knowledge/outcomes?hsLang=en#data-accessibility)
August 28, 2026
# Tableau Basics: Navigating Your Hi Rasmus Workbook
## This guide covers the basics you'll actually use with your Hi Rasmus workbook: getting around, saving your work, exporting data, and filtering down to what matters.
### **Home Screen & Favorites**
When you log in, you'll land on your Tableau home screen. This is your starting point every time.
1. Log in with the viewer seat credentials provided to you
2. From the home screen, you'll see your available workbook listed. Click into your workbook to open it.
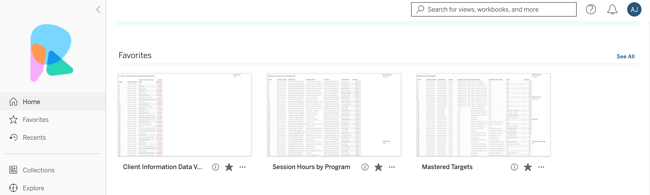
3. To mark a workbook or a specific view as a favorite, click the star icon next to its name.
4. Favorites appear on your home screen and in the Favorites tab, so you can jump straight back to the views you use most instead of navigating through folders each time.
**
**Pro Tip:** If you check the same tab every week (like Program Validation), favorite it — it'll save you clicks every time you log in.
### **Navigating Between Workbook Tabs**
Each workbook is organized into tabs across the top — Session Programs, All Programs, Mastered Targets, and so on. These tabs are how you move between the different views in your workbook.
1. Click directly on any tab name to open that view.
2. There are more tabs than fit on screen at once. Use the left/right arrow icons right before the tab row to scroll through them one at a time.
3. For a faster way to jump around, click the small dropdown arrow at the very left edge of the tab row. It opens a full list of every tab in the workbook so you can jump straight to the one you want instead of scrolling through each one. 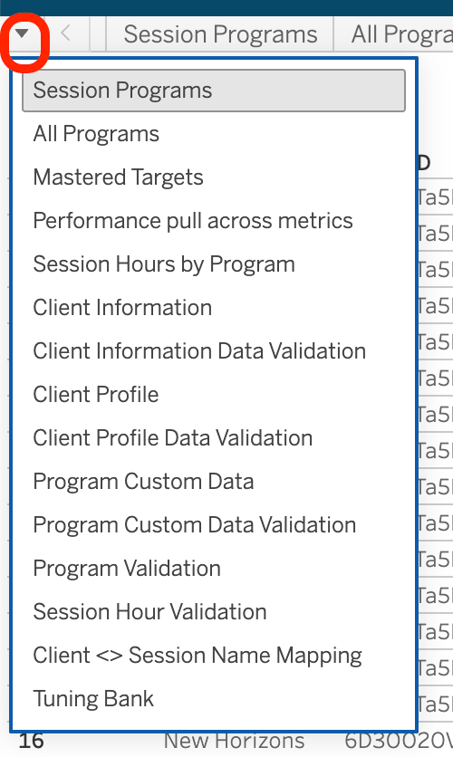
4. The tab you're currently viewing is highlighted so you always know where you are.
### **Filtering and Segmenting Rows & Columns (Including “Keep Only”)**
Filtering lets you narrow the view down to a specific client, program, or time period without changing the underlying data.
1. Look for the filter pane, usually on the right-hand side of the tab.
2. Click into a filter (e.g., Client, Program, Month) and select the value(s) you want to view.
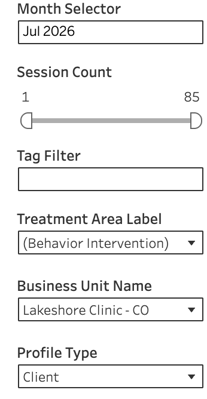
3. The view will update automatically to reflect your selection.
4. To clear a filter, click the small "x" or "Clear" option on that filter, or use "Reset" to clear all filters on the tab at once.
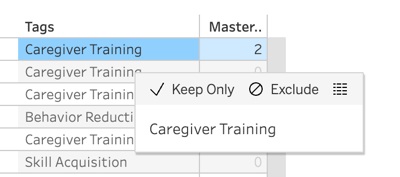
5. You can also filter directly from a row or column: right-click on a specific value and choose "Keep Only" to isolate just that value, or "Exclude" to remove it from view.
**Pro Tip:** Filters you apply only affect your own view in the moment. They don't change the data for anyone else looking at the workbook.
### **Saving a View**
A "view" is a snapshot of a tab with your specific filters, sort order, and settings already applied. Saving a view means you don't have to re-set those filters every time you come back.
1. Set up the tab the way you want it- apply your filters, sorting, etc.
2. Go to the toolbar at the top of the workbook and select the "Save Custom View" option, give the view a clear, specific name (e.g., "March-Program Validation-Site A").
1. You also have the option to make it a default view for the workbook.
2. Your saved view will now appear under your list of custom views and can be favorited for even faster access.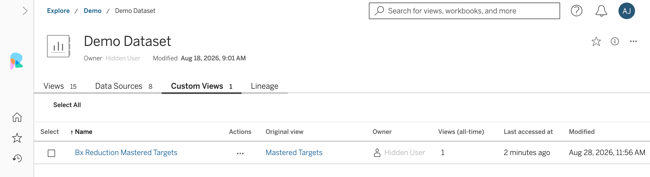
3. When in your custom view, you can also change the view back to the original by selecting manage custom views on the top menu bar 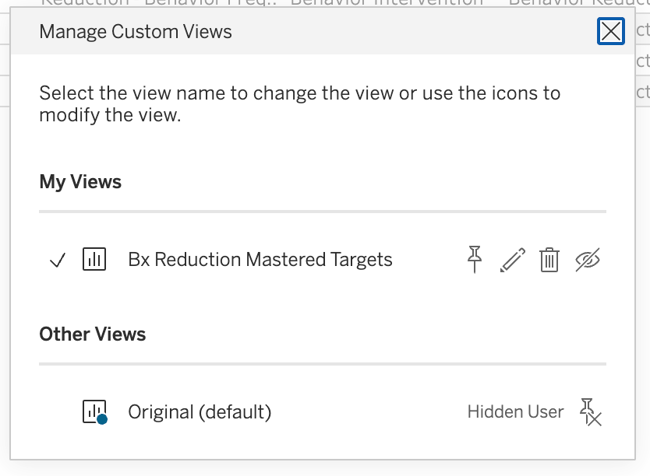
**Pro Tip:** Saved views are personal to you — they won't change what other users on your team see.
### **Downloading an Export / Downloading Data**
You can pull data out of Tableau in a few different formats, depending on what you need it for.
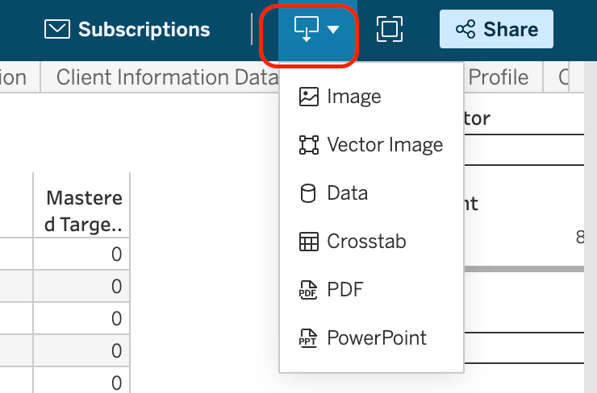
1. Look for the download icon in the toolbar at the top right corner of the workbook.
2. Choose the format you need:
1. Crosstab (Excel/CSV) — best when you want to work with the underlying data in a spreadsheet
2. PDF — best for a printable or shareable snapshot
3. Image — best for quickly dropping a view into an email or slide
3. The export will reflect whatever filters you currently have applied, so double-check your filters before downloading.
Need More Help? This covers the basics you'll use day to day. If you want to go further, Tableau has its own full support center you're welcome to explore [here](https://help.tableau.com/current/online/en-us/tableau-online-home.htm)
- [Getting Started](https://help.hirasmus.com/knowledge/getting-started?hsLang=en#main-content)
- [Quickstart Guide](https://help.hirasmus.com/knowledge/getting-started?hsLang=en#quickstart-guide)
- [Hi Rasmus 101: Using Hi Rasmus as a Behavior Technician](https://help.hirasmus.com/knowledge/getting-started?hsLang=en#hi-rasmus-101-using-hi-rasmus-as-a-behavior-technician)
- [Hi Rasmus 201: Hi Rasmus Guide for BCBAs / Behavior Analysts](https://help.hirasmus.com/knowledge/getting-started?hsLang=en#hi-rasmus-201-hi-rasmus-guide-for-bcbas-behavior-analysts)
- [Hi Rasmus 101: Using Hi Rasmus in a Multi-Disciplinary Setting](https://help.hirasmus.com/knowledge/getting-started?hsLang=en#hi-rasmus-101-using-hi-rasmus-in-a-multi-disciplinary-setting)
- [Managing Clients & Users](https://help.hirasmus.com/knowledge/managing-clients-users?hsLang=en#main-content)
- [Managing Clients](https://help.hirasmus.com/knowledge/managing-clients-users?hsLang=en#managing-clients)
- [Managing Users](https://help.hirasmus.com/knowledge/managing-clients-users?hsLang=en#managing-users)
- [Client \<\> User Access](https://help.hirasmus.com/knowledge/managing-clients-users?hsLang=en#client-user-access)
- [User Privileges](https://help.hirasmus.com/knowledge/managing-clients-users?hsLang=en#user-privileges)
- [Multi-factor Authentication (MFA)](https://help.hirasmus.com/knowledge/managing-clients-users?hsLang=en#multi-factor-authentication-mfa)
- [Single Sign On](https://help.hirasmus.com/knowledge/managing-clients-users?hsLang=en#single-sign-on)
- [Staff Licenses](https://help.hirasmus.com/knowledge/staff-licenses?hsLang=en)
- [Creating Programs](https://help.hirasmus.com/knowledge/creating-programs?hsLang=en#main-content)
- [Your Program Library](https://help.hirasmus.com/knowledge/creating-programs?hsLang=en#your-program-library)
- [Program Setup: Prompt Levels and Workflows](https://help.hirasmus.com/knowledge/creating-programs?hsLang=en#program-setup-prompt-levels-and-workflows)
- [Program Setup: Program Building Blocks](https://help.hirasmus.com/knowledge/creating-programs?hsLang=en#program-setup-program-building-blocks)
- [Creating Programs by Type](https://help.hirasmus.com/knowledge/creating-programs?hsLang=en#creating-programs-by-type)
- [Specific Program Capabilities](https://help.hirasmus.com/knowledge/creating-programs?hsLang=en#specific-program-capabilities)
- [Featured Programs and Library Catalog](https://help.hirasmus.com/knowledge/creating-programs?hsLang=en#featured-programs-and-library-catalog)
- [Client Progress](https://help.hirasmus.com/knowledge/client-progress?hsLang=en#main-content)
- [Reviewing Client Data](https://help.hirasmus.com/knowledge/client-progress?hsLang=en#reviewing-client-data)
- [Program Modifications](https://help.hirasmus.com/knowledge/client-progress?hsLang=en#program-modifications)
- [Client Progress Reports](https://help.hirasmus.com/knowledge/client-progress?hsLang=en#client-progress-reports)
- [Assessment Results](https://help.hirasmus.com/knowledge/client-progress?hsLang=en#assessment-results)
- [Exporting Data](https://help.hirasmus.com/knowledge/client-progress?hsLang=en#exporting-data)
- [Operational Tools, Reporting and Auditing](https://help.hirasmus.com/knowledge/operational-tools-reporting-and-auditing?hsLang=en#main-content)
- [Single Client Reporting / Auditing](https://help.hirasmus.com/knowledge/operational-tools-reporting-and-auditing?hsLang=en#single-client-reporting-auditing)
- [Cross Client Reporting / Auditing (Premium)](https://help.hirasmus.com/knowledge/operational-tools-reporting-and-auditing?hsLang=en#cross-client-reporting-auditing-premium)
- [Activity Time Change Requests](https://help.hirasmus.com/knowledge/operational-tools-reporting-and-auditing?hsLang=en#activity-time-change-requests)
- [Sessions](https://help.hirasmus.com/knowledge/sessions?hsLang=en#main-content)
- [Setting Up a Client Session](https://help.hirasmus.com/knowledge/sessions?hsLang=en#setting-up-a-client-session)
- [Running a Client Session](https://help.hirasmus.com/knowledge/sessions?hsLang=en#running-a-client-session)
- [Completing Session Notes](https://help.hirasmus.com/knowledge/sessions?hsLang=en#completing-session-notes)
- [Group Sessions](https://help.hirasmus.com/knowledge/sessions?hsLang=en#group-sessions)
- [Reviewing and Editing Sessions / Activities](https://help.hirasmus.com/knowledge/sessions?hsLang=en#reviewing-and-editing-sessions-activities)
- [Supervision Mode](https://help.hirasmus.com/knowledge/supervision-mode?hsLang=en#main-content)
- [Supervision Criteria](https://help.hirasmus.com/knowledge/supervision-mode?hsLang=en#supervision-criteria)
- [Supervising Live Sessions](https://help.hirasmus.com/knowledge/supervision-mode?hsLang=en#supervising-live-sessions)
- [Supervision Session Notes](https://help.hirasmus.com/knowledge/supervision-mode?hsLang=en#supervision-session-notes)
- [Templates](https://help.hirasmus.com/knowledge/templates?hsLang=en#main-content)
- [Session Notes](https://help.hirasmus.com/knowledge/templates?hsLang=en#session-notes)
- [Forms](https://help.hirasmus.com/knowledge/templates?hsLang=en#forms)
- [Treatment Plans and Progress Reports](https://help.hirasmus.com/knowledge/templates?hsLang=en#treatment-plans-and-progress-reports)
- [Activity Types](https://help.hirasmus.com/knowledge/templates?hsLang=en#activity-types)
- [Integrations](https://help.hirasmus.com/knowledge/integrations?hsLang=en#main-content)
- [Aloha ABA Integration](https://help.hirasmus.com/knowledge/integrations?hsLang=en#aloha-aba-integration)
- [Aloha Integration: FAQ And Troubleshooting](https://help.hirasmus.com/knowledge/integrations?hsLang=en#aloha-integration-faq-and-troubleshooting)
- [Lumary Integration: Overview](https://help.hirasmus.com/knowledge/integrations?hsLang=en#lumary-integration-overview)
- [Lumary Integration: Set Up](https://help.hirasmus.com/knowledge/integrations?hsLang=en#lumary-integration-set-up)
- [Lumary Integration: Running and Reviewing Sessions](https://help.hirasmus.com/knowledge/integrations?hsLang=en#lumary-integration-running-and-reviewing-sessions)
- [Lumary Integration: FAQ and Troubleshooting](https://help.hirasmus.com/knowledge/integrations?hsLang=en#lumary-integration-faq-and-troubleshooting)
- [Boost Integration: Overview](https://help.hirasmus.com/knowledge/integrations?hsLang=en#boost-integration-overview)
- [Boost Integration: Set Up](https://help.hirasmus.com/knowledge/integrations?hsLang=en#boost-integration-set-up)
- [Boost Integration: Running and Reviewing Sessions](https://help.hirasmus.com/knowledge/integrations?hsLang=en#boost-integration-running-and-reviewing-sessions)
- [Boost Integration: FAQ and Troubleshooting](https://help.hirasmus.com/knowledge/integrations?hsLang=en#boost-integration-faq-and-troubleshooting)
- [Camber Integration: Overview](https://help.hirasmus.com/knowledge/integrations?hsLang=en#camber-integration-overview)
- [Camber Integration: Set up](https://help.hirasmus.com/knowledge/integrations?hsLang=en#camber-integration-set-up)
- [Camber: Running and Reviewing Sessions](https://help.hirasmus.com/knowledge/integrations?hsLang=en#camber-running-and-reviewing-sessions)
- [Camber: FAQ and Troubleshooting](https://help.hirasmus.com/knowledge/integrations?hsLang=en#camber-faq-and-troubleshooting)
- [TherapyPM](https://help.hirasmus.com/knowledge/integrations?hsLang=en#therapypm)
- [Offline Mode](https://help.hirasmus.com/knowledge/offline-mode?hsLang=en)
- [Parents](https://help.hirasmus.com/knowledge/parents?hsLang=en)
- [RBT Training](https://help.hirasmus.com/knowledge/rbt-training?hsLang=en)
- [Outcomes](https://help.hirasmus.com/knowledge/outcomes?hsLang=en#main-content)
- [Data Accessibility](https://help.hirasmus.com/knowledge/outcomes?hsLang=en#data-accessibility)
- [AI](https://help.hirasmus.com/knowledge/ai?hsLang=en#main-content)
- [AI Note Auditor](https://help.hirasmus.com/knowledge/ai?hsLang=en#ai-note-auditor)
- [Scheduling](https://help.hirasmus.com/knowledge/scheduling?hsLang=en#main-content)
- [🏁 Scheduling: Getting Started](https://help.hirasmus.com/knowledge/scheduling?hsLang=en#scheduling-getting-started)
- [🛠️ Scheduling: Set Up](https://help.hirasmus.com/knowledge/scheduling?hsLang=en#%EF%B8%8F-scheduling-set-up)
- [⚙️ Scheduling: Calendar Views and Settings](https://help.hirasmus.com/knowledge/scheduling?hsLang=en#%EF%B8%8F-scheduling-calendar-views-and-settings)
- [📆 Scheduling: Creating and Updating Appointments and Events](https://help.hirasmus.com/knowledge/scheduling?hsLang=en#scheduling-creating-and-updating-appointments-and-events)
- [✅ Scheduling: Completing Scheduled Appointments](https://help.hirasmus.com/knowledge/scheduling?hsLang=en#scheduling-completing-scheduled-appointments)
- [📈 Scheduling: Appointments Reporting](https://help.hirasmus.com/knowledge/scheduling?hsLang=en#scheduling-appointments-reporting)
- [Frequently Asked Questions](https://help.hirasmus.com/knowledge/frequently-asked-questions?hsLang=en#main-content)
- [Subscription and Invoices](https://help.hirasmus.com/knowledge/frequently-asked-questions?hsLang=en#subscription-and-invoices)
- [Device and App Info](https://help.hirasmus.com/knowledge/frequently-asked-questions?hsLang=en#device-and-app-info)
- [Recovering Deleted Items](https://help.hirasmus.com/knowledge/frequently-asked-questions?hsLang=en#recovering-deleted-items)
- [Settings](https://help.hirasmus.com/knowledge/settings?hsLang=en)
- [New and Coming Soon!](https://help.hirasmus.com/knowledge/new-and-coming-soon?hsLang=en#main-content)
- [Coming Soon](https://help.hirasmus.com/knowledge/new-and-coming-soon?hsLang=en#coming-soon)
[](https://hirasmus.com)
Help Center
Copyright © 2026, Hi Rasmus Inc.